
해당 사이트를 기준으로 작성하였습니다.
https://codelabs.developers.google.com/codelabs/flutter#0
Building beautiful UIs with Flutter | Google Codelabs
Flutter is Google’s UI toolkit for building beautiful, natively compiled applications for mobile, web, and desktop from a single codebase. In this codelab, you learn how to build a Flutter UI from the ground up in an IDE. You also customize your user int
codelabs.developers.google.com
1. Introduction
Flutter is Google's UI toolkit for building beautiful, natively compiled applications for mobile, web, and desktop from a single codebase. In this codelab, you'll create a simple chat application for Android, iOS, and (optionally) the web.
This codelab provides a deeper dive into Flutter than Write Your First Flutter App, part 1 and part 2. If you want a gentler introduction to Flutter, start with those.
Flutter는 단일 코드베이스에서 모바일, 웹 및 데스크톱을 위한 아름답고 기본적으로 컴파일된 애플리케이션을 구축하기 위한 Google의 UI 툴킷입니다. 이 코드랩에서는 Android, iOS 및 (선택사항) 웹을 위한 간단한 채팅 응용 프로그램을 만듭니다.
이 코드랩은 Write Your First Flow App part1과 part2보다 더 깊이 있는 flutter을 제공합니다. flutter에 대해 좀 더 부드럽게 소개하고 싶다면, 그것부터 시작하세요. 선수로 part1, 2를 보고 오라고 합니다
What you learn
How to write a Flutter app that looks natural on both Android and iOS
How to use the Android Studio IDE, using many shortcuts supported by the Flutter plugin for Android Studio and IntelliJ
How to debug your Flutter app
How to run your Flutter app on an emulator, a simulator, and a deviceAndroid와 iOS에서 모두 자연스러워 보이는 Flules 앱을 쓰는 방법
Android Studio 및 IntelliJ용 Flow 플러그인이 지원하는 많은 바로 가기를 사용하여 Android Studio IDE를 사용하는 방법
Flow 앱을 디버깅하는 방법
에뮬레이터, 시뮬레이터 및 장치에서 Flud 앱을 실행하는 방법
2. Set up your Flutter environment
3. Start a new Flutter project
4. Build the main user interface
In this section, you begin modifying the default sample app, to make it a chat app. The goal is to use Flutter to build FriendlyChat, a simple, extensible chat app with these features:
The app displays text messages in real time.
Users can enter a text string message, and send it either by pressing the Return key or the Send button.
The UI runs on Android and iOS devices, as well as the web.
Try the finished app on DartPad!
Create the main app scaffold
The first element you add is a simple app bar that shows a static title for the app. As you progress through subsequent sections of this codelab, you incrementally add more responsive and stateful UI elements to the app.
The main.dart file is located under the lib directory in your Flutter project, and contains the main() function that starts the execution of your app.
▶Replace all of the code in main.dart with the following:
import 'package:flutter/material.dart';

void main() {
  runApp(
    MaterialApp(
      title: 'FriendlyChat',
      home: Scaffold(
        appBar: AppBar(
          title: Text('FriendlyChat'),
        ),
      ),
    ),
  );
}Observations
Any Dart program, whether it's a command-line app, an AngularDart app, or a Flutter app, starts with a main() function.
The main() and runApp() function definitions are the same as in the automatically generated app.
The runApp() function takes as its argument a Widget, which the Flutter framework expands and displays to the screen at run time.
This chat app uses Material Design elements in the UI, so a MaterialApp object is created and passed to the runApp() function. The MaterialApp widget becomes the root of your app's widget tree.
The home argument specifies the default screen that users see in your app. In this case, it consists of a Scaffold widget that has a simple AppBar as its child widget. This is typical for a Material app.
▶ Run the app by clicking the Run icon ▶ in the editor . The first time you run an app, it can take a while. The app is faster in later steps.
command-line app, AngularDart app 또는 Flutter app 등 모든 Dart 프로그램은 main() 기능으로 시작합니다.
main() 과 runApp() 함수 정의는 자동으로 생성된 앱에서와 동일합니다.
runApp() 함수는 Widget의 인수를 Flutter framework를 확장하여 런타임에 화면으로 표시하는 Widget으로 간주합니다.
이 채팅 앱은 UI에서 Material Design elements를 사용하므로 MaterialApp 객체가 생성되어 runApp() 함수로 전달됩니다. MaterialApp 위젯은 앱 위젯 tree의 root가 됩니다.
the home argument는 사용자가 앱에서 볼 수 있는 기본 화면을 지정합니다. 이 경우 간단한 AppBar child 위젯으로 하는 Scaffold 위젯으로 구성된다. Material app의 경우 일반적으로 사용됩니다.
편집기에서 실행 아이콘을 클릭하여 앱을 실행합니다. 처음 앱을 실행할 때는 시간이 좀 걸릴 수 있습니다. 이후 단계에서 앱이 더 빠릅니다.
|
Tip: What is hot reload, hot restart, and full restart? |

Build the chat screen
To lay the groundwork for interactive components, you break the simple app into two different subclasses of widget: a root-level FriendlyChatApp widget that never changes and a child ChatScreen widget that rebuilds when messages are sent and internal state changes. For now, both these classes can extend StatelessWidget. Later, you modify ChatScreen to be a stateful widget. That way, you can change its state as needed.
대화형 구성 요소의 기본 구조를 구축하려면 단순 앱을 두 가지 위젯의 하위 클래스, 즉 절대 변경되지 않는 루트 수준 FriendlyChatApp 위젯과 메시지가 전송되고 내부 상태가 변경될 때 재구성되는 하위 채팅 화면 위젯으로 나눕니다. 현재로서는 두 클래스 모두 StatelessWidget를 확장할 수 있습니다. 나중에 채팅 화면을 상태 저장 위젯으로 수정합니다. 이렇게 하면 필요에 따라 상태를 변경할 수 있습니다.
▶ Create the FriendlyChatApp widget:
1. Inside main(), place the cursor in front of the M in MaterialApp.
2. Right-click, and select Refactor > Extract > Extract Flutter widget.
▶FriendlyChatApp 위젯 생성:
1. main() 안쪽에 있는 Material App의 M 앞에 커서를 놓습니다.
2. 마우스 오른쪽 버튼을 클릭하고 Refactor > Extract > Extract Flutter widget을 선택합니다.


3. Enter FriendlyChatApp into the ExtractWidget dialog, and click the Refactor button. The MaterialApp code is placed in a new stateless widget called FriendlyChatApp, and main() is updated to call that class when it calls the runApp() function.
3. ExtractWidget dialog에 FriendlyChatApp 입력하고 Refactor 버튼을 클릭합니다. MaterialApp 코드는 FriendlyChatApp이라는 새 stateless 위젯에 배치되고, runApp()을 호출할 때 해당 클래스를 호출하도록 main()이 업데이트됩니다.


Refactor 버튼을 누르면 자동으로 stateless 형식의 위젯이 생성되었다. 위젯의 이름은 내가 입력한 인풋이 들어간다.
4. Select the block of text after home:. Start with Scaffold( and end with the Scaffold's closing parenthesis, ). Do not include the ending comma.
4. home: 뒤에 있는 텍스트 블록을 선택합니다. Scaffold로 시작합니다(그리고 Scaffold의 닫는 괄호, ) 끝 쉼표는 포함하지 마십시오.

5. Start typing ChatScreen, and select ChatScreen() from the popup. (Choose the ChatScreen entry that is marked with an equal sign inside the yellow circle. This gives you a class with empty parentheses, rather than a constant.)
5. ChatScreen 입력을 시작하고 팝업에서 ChatScreen()을 선택합니다. (노란색 원 안에 동일한 기호가 표시된 채팅 화면 항목을 선택합니다. 이렇게 하면 상수 대신 빈 괄호 안의 클래스가 제공됩니다.)

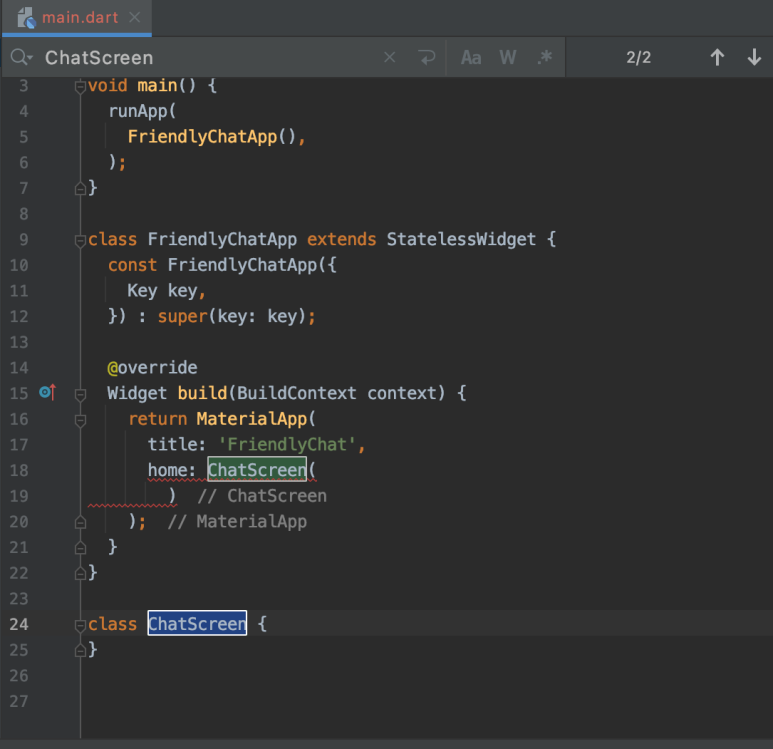
▶Create a stateless widget, ChatScreen:
Under the FriendlyChatApp class, around line 27, start typing stless. The editor asks if you want to create a Stateless widget. Press Return to accept. The boilerplate code appears, and the cursor is positioned for you to enter the name of your stateless widget. Enter ChatScreen.
▶Stateless 위젯을 만듭니다. ChatScreen:
FriendlyChatApp 클래스 밑에, 27번줄 주위에 stless typing을 시작합니다. 편집기에서 stateless 위젯을 만들 것인지 묻습니다. 승인하려면 Return을 누릅니다. 반복 사용 코드가 나타나고 stateless 위젯의 이름을 입력할 수 있는 커서가 배치됩니다. ChatScreen을 입력합니다.


▶Update the ChatScreen widget:
Inside the ChatScreen widget, select Container, and start typing Scaffold. Select Scaffold from the popup.
ChatScreen 위젯에서 Container,를 선택하고 Scaffold를 입력합니다. 팝업에서 Scaffold를 선택합니다.

The cursor should be positioned inside the parentheses. Press Return to start a new line.
커서는 괄호 안에 위치해야 합니다. 새 줄을 시작하려면 Return를 누릅니다.

Start typing appBar, and select appBar: from the popup.
appBar 입력을 시작하고, 팝업에서 appBar:를 선택합니다.


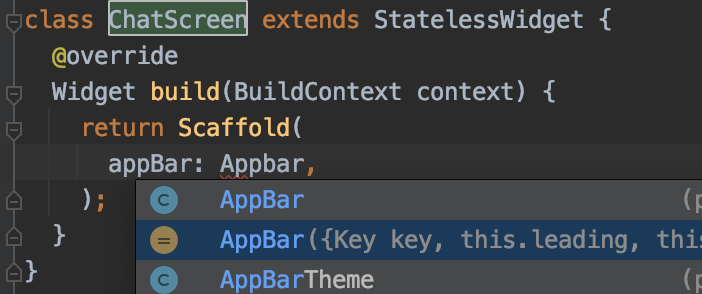
After appBar:, start typing AppBar, and select the AppBar class from the popup.
appBar: 후에 AppBar 입력을 시작하고 팝업에서 AppBar 클래스를 선택합니다.
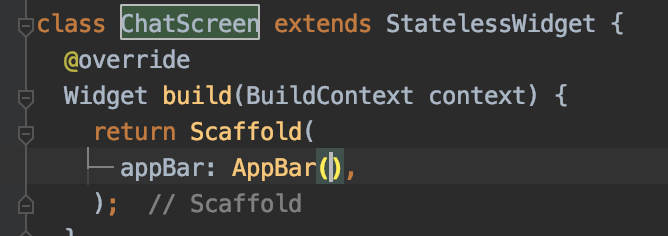
Within the parentheses, start typing title, and select title: from the popup.
괄호 내에서, title 입력을 시작하고 팝업에서 title:을 선택합니다.


After title:, start typing Text, and select the Text class.
title: 뒤에 Text 입력을 시작하고 Text 클래스를 선택합니다.
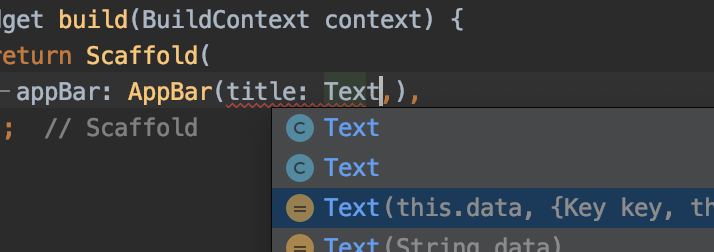
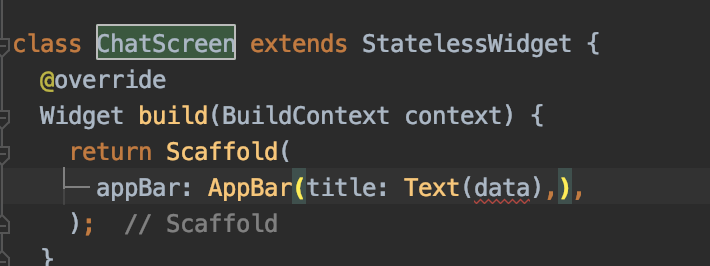
The boilerplate code for Text contains the word data. Delete the first comma after data. Select data, and replace it with 'FriendlyChat'. (Dart supports single or double quotation marks, but prefers single quotation marks unless the text already contains a single quotation mark.)
Text의 상용구 코드는 워드 데이터를 포함합니다. 데이터 다음에 첫 번째 쉼표를 삭제합니다. 데이터를 선택하여 'FriendlyChat'으로 대체한다.(다트는 작은따옴표나 큰따옴표를 지원하지만, 텍스트에 이미 작은따옴표가 없는 한 작은따옴표를 선호한다.)


Look in the upper, right corner of the code pane. If you see a green checkmark, then your code passed analysis. Congratulations!
코드 창의 오른쪽 상단 모서리를 살펴봅니다. 녹색 체크 표시가 나타나면 코드가 분석을 통과했습니다. 축하합니다!

|
Tip: The commas tell the formatter where to break the lines. Including a comma at the end of a line tells the formatter to nest that section. Try adding and removing commas, and then right-click in the code pane, and select Reformat with dartfmt from the popup to see how this works. 쉼표는 포맷자에게 선을 끊을 위치를 알려줍니다. 줄 끝에 쉼표를 포함하면 포맷터가 해당 섹션을 중첩하도록 지시합니다. 쉼표를 추가 및 제거한 다음 코드 창에서 마우스 오른쪽 단추를 클릭하고 팝업에서 Reformat with dartfmt을 선택하여 어떻게 작동하는지 확인합니다. |
This step introduces several key concepts of the Flutter framework:
이 단계에서는 Flutter framework의 몇 가지 주요 개념을 소개합니다.
You describe the part of the user interface represented by a widget in its build() method. The framework calls the build() methods for FriendlyChatApp and ChatScreen when inserting these widgets into the widget hierarchy and when their dependencies change.
위젯으로 표시되는 사용자 인터페이스의 일부를 build() 방법으로 설명합니다. 프레임워크는 위젯을 위젯 계층에 삽입할 때와 종속성이 변경될 때 FriendlyChatApp 및 ChatScreen의 build() 방법을 호출합니다.
@override is a Dart annotation that indicates that the tagged method overrides a superclass's method.
@override는 태그가 지정된 method가 수퍼 클래스의 method를 재정의함을 나타내는 Dart 주석입니다.
Some widgets, like Scaffold and AppBar, are specific to Material Design apps. Other widgets, like Text, are generic and can be used in any app. Widgets from different libraries in the Flutter framework are compatible and can work together in a single app.
Scaffold 및 AppBar와 같은 일부 위젯은 Material Design 앱에만 해당됩니다. Text와 같은 다른 위젯은 일반적이며 모든 앱에서 사용할 수 있습니다. Flutter 프레임워크의 서로 다른 라이브러리의 위젯은 호환되며 단일 앱에서 함께 작동할 수 있습니다.
Simplifying the main() method enables hot reload because hot reload doesn't rerun main().
main() 방법을 단순화하면 main()를 다시 실행하지 않으므로 main()를 hot reload할 수 있습니다.
▶ Click the hot reload

button to see the changes almost instantly. After dividing the UI into separate classes and modifying the root widget, you should see no visible change in the UI.
변경 내용을 거의 즉시 보려면 핫 다시 로드 버튼을 클릭하십시오. UI를 별도의 클래스로 나누고 루트 위젯을 수정하면 UI에 눈에 띄는 변화가 나타나지 않습니다.
|
Tip: If, at any point, you see a red screen after a hot reload, try a hot restart. If that doesn't fix the problem, then stop the app, and perform a full restart. Hot reload changes the state of existing widgets. The red screen can happen, for example, if you delete a widget before a hot reload—the app can fail when the framework tries to update those older widgets. hot reload 후 빨간색 화면이 나타나면 hot restart를 시도합니다. 그래도 문제가 해결되지 않으면 앱을 중지하고 full restart을 수행하십시오. hot reload는 기존 위젯의 상태를 변경합니다. 빨간색 화면은 예를 들어 hot reload 전에 위젯을 삭제하는 경우 발생할 수 있습니다. 프레임워크가 이전 위젯을 업데이트하려고 할 때 앱이 실패할 수 있습니다. |
길어진 관계로 나머지는 후속편으로 진행하도록 하겠습니다.
gurcks8989/Flutter
Application_Development_Project. Contribute to gurcks8989/Flutter development by creating an account on GitHub.
github.com
훈수 환영입니다. 정정할 수 있게 도와주세요
이어지는 게시글들입니다.
01/21/목 - Building beautiful UIs with Flutter - 2
해당 사이트를 기준으로 작성하였습니다. https://codelabs.developers.google.com/codelabs/flutter#0 Building beautiful UIs with Flutter | Google Codelabs Flutter is Google’s UI toolkit for building..
coding-leaf.tistory.com
01/21/목 - Building beautiful UIs with Flutter - 3
해당 사이트를 기준으로 작성하였습니다. https://codelabs.developers.google.com/codelabs/flutter#0 Building beautiful UIs with Flutter | Google Codelabs Flutter is Google’s UI toolkit for build..
coding-leaf.tistory.com
