
해당 사이트를 기준으로 작성하였습니다.
https://codelabs.developers.google.com/codelabs/flutter#0
Building beautiful UIs with Flutter | Google Codelabs
Flutter is Google’s UI toolkit for building beautiful, natively compiled applications for mobile, web, and desktop from a single codebase. In this codelab, you learn how to build a Flutter UI from the ground up in an IDE. You also customize your user int
codelabs.developers.google.com
또한 이전 게시글의 후속편이기 때문에 5번부터 시작합니다. 진행에 어려움이 있다면 아래 글을 먼저 보고 오시는 것을 추천드립니다.
01/21/목 - Building beautiful UIs with Flutter - 1
해당 사이트를 기준으로 작성하였습니다. https://codelabs.developers.google.com/codelabs/flutter#0 Building beautiful UIs with Flutter | Google Codelabs Flutter is Google’s UI toolkit for building..
coding-leaf.tistory.com
5. Add a UI for composing messages
In this section, you learn how to build a user control that enables the user to enter and send chat messages.

On a device, clicking the text field brings up a soft keyboard. Users can send chat messages by typing a non-empty string and pressing the Return key on the soft keyboard. Alternatively, users can send their typed messages by pressing the graphical Send button next to the input field.
장치에서 텍스트 필드를 클릭하면 soft keyboard가 나타납니다. 사용자는 비어 있지 않은 문자열을 입력하고 soft keyboard의 Return 키를 눌러 채팅 메시지를 보낼 수 있습니다. 또는 입력 필드 옆에 있는 그래픽 보내기 버튼을 눌러 입력한 메시지를 보낼 수 있습니다.
For now, the UI for composing messages is at the top of the chat screen, but after you add the UI for displaying messages in the next step, you move it to the bottom of the chat screen.
일단 메시지 작성 UI는 채팅 화면 상단에 있지만, 다음 단계에서 메시지 표시 UI를 추가한 후 채팅 화면 맨 아래로 이동합니다.
Add an interactive text input field
The Flutter framework provides a Material Design widget called TextField. It's a StatefulWidget (a widget that has mutable state) with properties for customizing the behavior of the input field. State is information that can be read synchronously when the widget is built and might change during the lifetime of the widget. Adding the first stateful widget to the FriendlyChat app requires making a few modifications.
Flutter framework는 TextField.라는 Material Design 위젯을 제공합니다. StatefulWidget(변수할 수 있는 상태의 위젯)이며 입력 필드의 동작을 사용자 정의하기 위한 속성이 있습니다. State는 위젯이 작성될 때 동시에 읽을 수 있으며 위젯의 수명동안 변경될 수 있는 정보입니다. stateful 위젯을 처음 FriendlyChat 앱에 추가하려면 몇 가지 수정이 필요합니다.
▶ Change the ChatScreen class to be stateful:
Select ChatScreen in the line class ChatScreen extends StatelessWidget.
Press Option+Return (macOS) or Alt+Enter (Linux and Windows) to bring up a menu.
stateful으로 ChatScreen 클래스를 변경합니다.
class ChatScreen extends StatelessWidget 줄에서 ChatScreen을 선택합니다
Option+Return(macOS) 또는 Alt+Enter(Linux 및 Windows)를 눌러 메뉴를 불러옵니다.

From the menu, select Convert to StatefulWidget. The class is automatically updated with the boilerplate code for a stateful widget including a new _ChatScreenState class for managing state.
메뉴에서 Convert to StatefulWidget을 선택합니다. 클래스는 상태 관리를 위한 새로운 _ChatScreenState 클래스를 포함하여 stateful 위젯의 상용구 코드로 자동 업데이트됩니다.
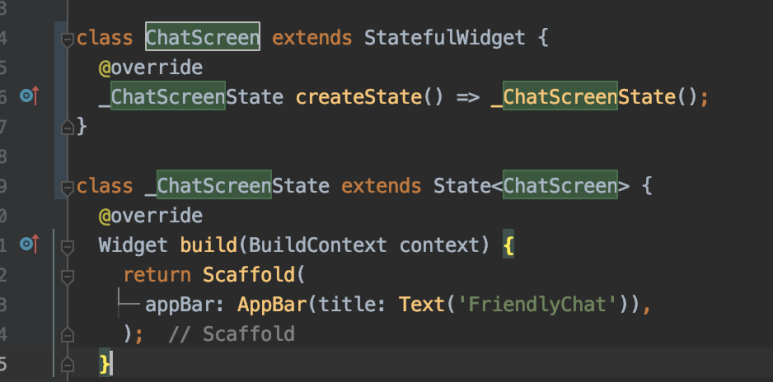
|
Tip: Prefixing an identifier with an underscore (_) makes the identifier private to its library. A Dart library bundles a set of classes, constants, functions, typedefs, properties, and exceptions into one package. The Dart compiler enforces privacy. For more information, see Libraries and visibility on dart.dev. 식별자에 밑줄(_)을 붙이면 식별자가 라이브러리에 대해 private으로 설정됩니다. Dart 라이브러리는 클래스, 상수, 함수, 유형 ef, 속성 및 예외 집합을 하나의 패키지로 묶습니다. Dart 컴파일러는 프라이버시를 강제한다. 자세한 내용은 dart.dev의 라이브러리 및 가시성을 참조하십시오. |
To manage interactions with the text field, you use a TextEditingController object for reading the contents of the input field and for clearing the field after the chat message is sent.
text field와의 상호 작용을 관리하려면 TextEditingController 개체를 사용하여 입력 필드 내용을 읽고 채팅 메시지를 보낸 후 필드를 지웁니다.
▶ Add a TextEditingController to _ChatScreenState.
Add the following as the first line in the _ChatScreenState class:
_ChatScreenState에 TextEditingController를 추가합니다.
다음을 _ChatScreenState 클래스의 첫 번째 행으로 추가합니다.
final _textController = TextEditingController();

|
Tip: It can be useful to view the source code definition of Flutter's framework APIs to get a better understanding of what's going on behind the scenes. You can do this easily from the editor panel in either Android Studio or IntelliJ by selecting a class or method name. Then, right-click and select the Go to... Declaration from the menu. Depending on the OS, you can also click while pressing the Command or Control button on the keyboard. See more options and keyboard shortcuts. Flutter의 framework APIs의 소스 코드 정의를 보고 뒤에서 무슨 일이 벌어지는지 더 잘 이해하는 것이 유용할 수 있습니다. Class 또는 Method 이름을 선택하여 Android Studio 또는 IntelliJ의 편집기 패널에서 쉽게 이 작업을 수행할 수 있습니다. 그런 다음 마우스 오른쪽 단추를 클릭하고 메뉴에서 Go to... Declaration을 선택합니다. OS에 따라 키보드의 Command(명령) 또는 Control(제어) 버튼을 눌러 클릭할 수도 있습니다. 추가 옵션 및 바로 가기 키를 참조하십시오. |
Now that your app has the ability to manage state, you can build out the ChatScreenState class with an input field and a Send button.
▶Add a _buildTextComposer function to _ChatScreenState:
이제 앱에서 상태를 관리할 수 있게 되었으므로 입력 필드와 보내기 버튼을 사용하여 ChatScreenState class를 빌드할 수 있습니다.
▶ _ChatScreenState에 _buildTextComposer 기능을 추가합니다:
  Widget _buildTextComposer() {
    return  Container(
        margin: EdgeInsets.symmetric(horizontal: 8.0),
      child: TextField(
        controller: _textController,
        onSubmitted: _handleSubmitted,
        decoration: InputDecoration.collapsed(
            hintText: 'Send a message'),
      ),
    );
}|
In Flutter, stateful data for a widget is encapsulated in a State object. |
Flutter에 위젯에 대한 stateful data가 State 객체에 캡슐화됩니다. |
|
The State object is then associated with a widget that extends the StatefulWidget class. |
State 객체가 StatefulWidgetclass를 확장하는 위젯과 연결됩니다. |
|
The code above defines a private method called _buildTextComposer() that returns a Container widget with a configured TextField widget. |
위의 코드는 구성된 TextField 위젯을 사용하여 Container 위젯을 반환하는 _buildTextComposer()라는 private method을 정의합니다 |
|
The Container widget adds a horizontal margin between the edge of the screen and each side of the input field. |
Container 위젯은 화면 가장자리와 입력 필드의 각 면 사이에 수평 여백을 추가합니다. |
|
The units passed to EdgeInsets.symmetric are logical pixels that get translated into a specific number of physical pixels, depending on a device's pixel ratio. You might be familiar with the equivalent term for Android (density-independent pixels) or for iOS (points). |
units가 장치의 픽셀 비율에 따라 특정 수의 물리적 픽셀으로 변환되는 논리적 픽셀인 EdgeInsets.symmetric로 전달되었습니다. |
|
The onSubmitted property provides a private callback method, _handleSubmitted(). |
onSubmitted 속성은 개인 콜백 방법인 _handleSubmitted()를 제공합니다. |
|
At first, this method just clears the field, but later you extend it to send the chat message. |
처음에 이 방법은 필드만 지우고 나중에 확장하여 채팅 메시지를 보냅니다. |
|
The TextField with the TextEditingController gives you control over the text field. |
TextEditingController가 있는 TextField를 사용하면 텍스트 필드를 제어할 수 있습니다. |
|
This controller will clear the field and read its value. |
이 controller는 필드를 지우고 값을 읽습니다. |
▶ Add the _handleSubmitted function to _ChatScreenState for clearing the text controller:
▶ text controller를 지우려면 _handleSubmitted 기능을 _ChatScreenState에 추가합니다.
void _handleSubmitted(String text) {
	_textController.clear();
}
Add a text composer widget
▶ Update the build() method for _ChatScreenState.
After the appBar: AppBar(...) line, add a body: property:
_ChatScreenState의 build() 방법을 업데이트합니다.
AppBar: AppBar(...) line, 뒤에 body: property:을 추가합니다.
@override Widget build(BuildContext context) {
	return Scaffold(
		appBar: AppBar(
		title: Text('FriendlyChat')),
		body: _buildTextComposer(), // NEW
	);
}The _buildTextComposer method returns a widget that encapsulates the text input field.
Adding _buildTextComposer to the body property causes the app to display the text input user control.
_buildTextComposer method는 text input field를 캡슐화하는 위젯을 반환합니다.
_buildTextComposer를 본문 속성에 추가하면 앱에서 text input user control를 표시합니다.
▶Hot reload the app. You should see a screen that looks like the following:
앱을 Hot reload합니다. 다음과 같은 화면이 나타납니다.
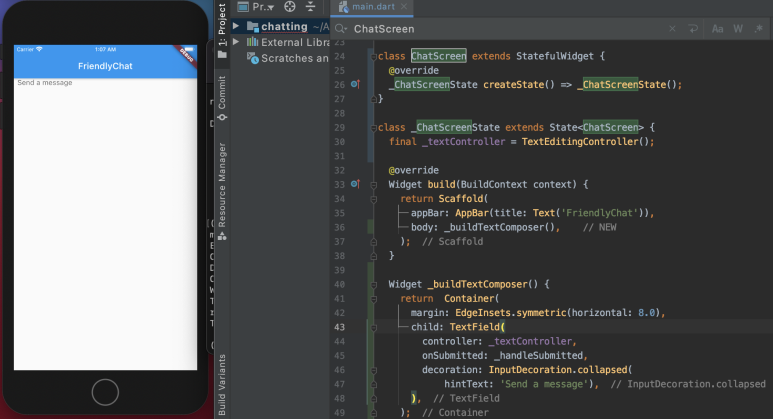
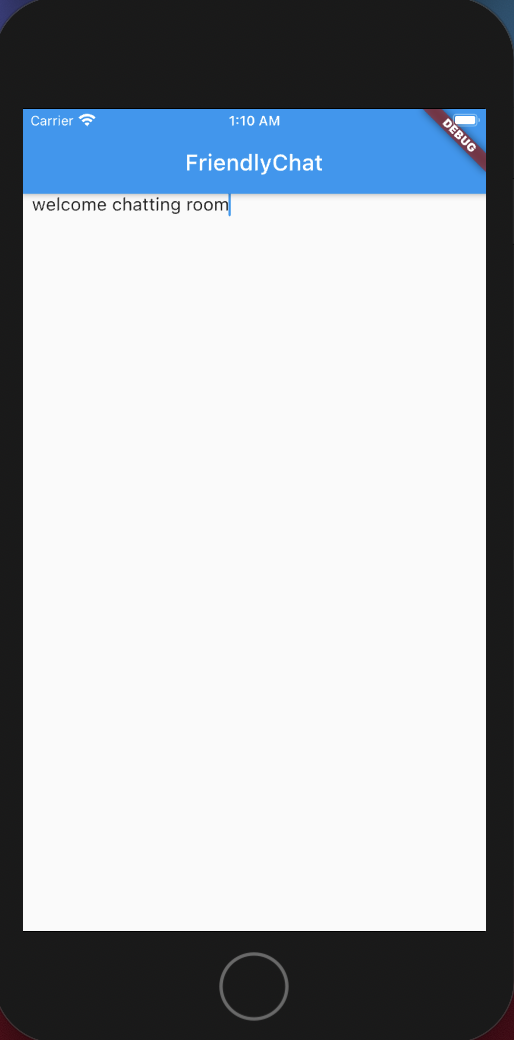
text를 입력하면 Send a message라는 표시는 없어지면서 텍스트가 입력됩니다
Add a responsive Send button
Next, you add a Send button to the right of the text field. This involves adding a bit more structure to the layout.
그런 다음 텍스트 필드 오른쪽에 보내기 단추를 추가합니다. 여기에는 레이아웃에 좀 더 많은 구조가 추가됩니다.
▶ In the _buildTextComposer function, wrap the TextField inside a Row:
_buildTextComposer 함수에서 행 내부의 TextField를 줄바꿈합니다.
1. Select TextField in _buildTextComposer.
1. _buildTextComposer에서 TextField를 선택합니다.
2. Press Option+Return (macOS) or Alt+Enter (Linux and Windows) to bring up a menu, and select Wrap with widget. A new widget is added that wraps the TextField. The placeholder name is selected, and the IDE waits for you to enter a new placeholder name.
2. 메뉴를 불러오려면 Option+Return(MacOS) 또는 Alt+Enter(Linux 및 Windows)를 누르고 Wrap with widget을 선택합니다. 텍스트 필드를 감싼 새 위젯이 추가됩니다. 무의미한 값이 이름이 선택되고 IDE는 사용자가 새 자리 표시자 이름을 입력할 때까지 기다립니다.
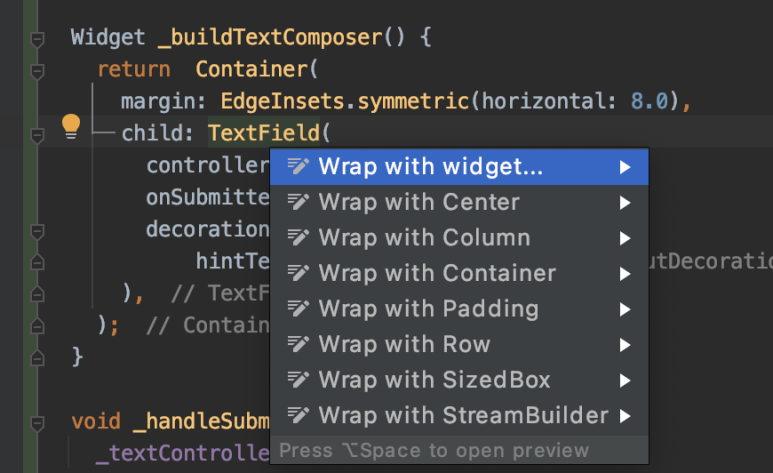
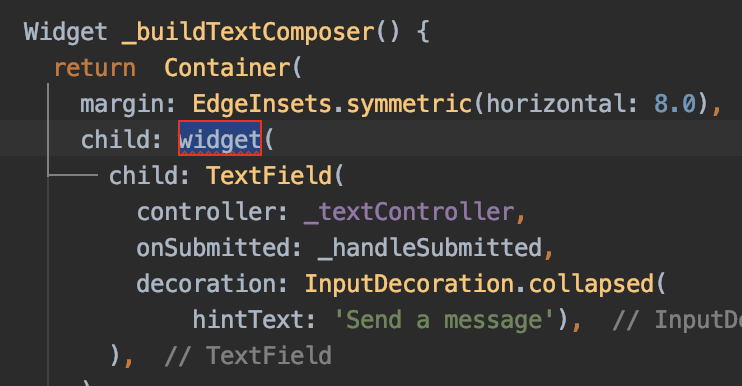
3. Start typing Row, and select Row from the list that appears. A popup appears containing the definition for the Row's constructor. The child property has a red border, and the analyzer tells you that you are missing the required children property.
3. Row를 입력하고 나타나는 목록에서 Row을 선택합니다. Row 생성자에 대한 정의가 들어 있는 팝업이 나타납니다. child 속성에 빨간색 테두리가 있으며 분석기에서 필요한 children 속성이 누락되었음을 알려줍니다.
4. Hover over child and a popup appears. In the popup, it asks if you want to change the property to children. Select that option.
4. child 항목 위로 마우스를 가져가면 팝업이 나타납니다. 팝업에서 속성을 children 항목으로 변경할지 여부를 묻습니다. 해당 옵션을 선택하십시오.
5. The children property takes a list, rather than a single widget. (Right now, there is only one item in the list, but you will add another soon.) Convert the widget to a list of one by typing a left bracket ([ ) after the children: text. The editor also provides the closing right bracket. Delete the closing bracket. Several lines down, just before the right parenthesis that closes the row, type the right bracket followed by a comma (],). The analyzer should now show a green checkmark.
5. children 속성은 하나의 위젯이 아닌 목록을 사용합니다. (현재 목록에는 하나의 항목만 있지만 곧 다른 항목을 추가합니다.) 자식: 텍스트 뒤에 왼쪽 괄호([)를 입력하여 위젯을 하나의 목록으로 변환합니다. 편집기는 닫는 오른쪽 괄호도 제공합니다. 클로징 브래킷을 삭제합니다. 행을 닫는 오른쪽 괄호 바로 앞에 여러 줄을 입력하고 오른쪽 괄호 뒤에 쉼표(],)를 입력합니다. 이제 분석기에 녹색 확인 표시가 나타납니다.
6. The code is now correct, but is not well formatted. Right-click in the code pane, and select Reformat Code with dartfmt
6. 코드가 이제 올바르지만 형식이 올바르지 않습니다. 코드 창에서 마우스 오른쪽 단추를 클릭하고 Reformat Code with dartfmt을 선택합니다.
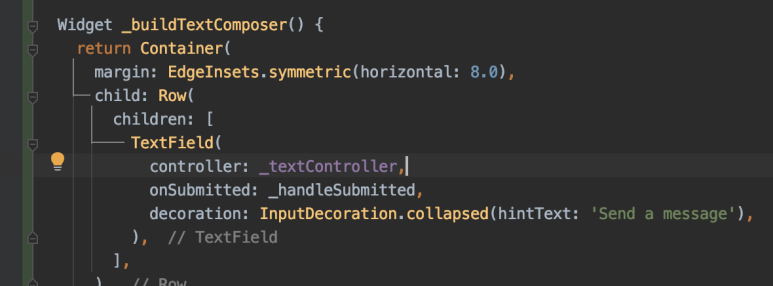
▶Wrap the TextField inside a Flexible:
▶ 텍스트 필드를 플렉서블 내부로 줄바꿈:
Flexible로 감싸준다(Row가 자동으로 버튼 이외의 남은 부분을 text field로 채우도록 size를 설정)
1. Select Row.
2. Press Option+Return (macOS) or Alt+Enter (Linux and Windows) to bring up a menu, and select Wrap with widget. A new widget is added that wraps the TextField. The placeholder name is selected, and the IDE waits for you to enter a new placeholder name.
3. Start typing Flexible, and select Flexible from the list that appears. A popup appears containing the definition for the Row's constructor.1. 행을 선택합니다.
2. 메뉴를 불러오려면 Option+Return(MacOS) 또는 Alt+Enter(Linux 및 Windows)를 누르고 Wrap with widget을 선택합니다. 텍스트 필드를 감싼 새 위젯이 추가됩니다. 자리 표시자 이름이 선택되고 IDE는 사용자가 새 자리 표시자 이름을 입력할 때까지 기다립니다.
3. Flexible를 입력하고 나타나는 목록에서 Flexible을 선택합니다. Row 생성자에 대한 정의가 들어 있는 팝업이 나타납니다.
Widget _buildTextComposer() {
  return  Container(
    margin: EdgeInsets.symmetric(horizontal: 8.0),
    child:  Row(                             // NEW
      children: [                            // NEW
         Flexible(                           // NEW
          child:  TextField(
            controller: _textController,
            onSubmitted: _handleSubmitted,
            decoration:  InputDecoration.collapsed(
                hintText: 'Send a message'),
          ),
        ),                                    // NEW
      ],                                      // NEW
    ),                                        // NEW
  );
}
Using a Row allows you to place the Send button adjacent to the input field.
Wrapping the TextField in a Flexible widget tells the Row to automatically size the text field to use the remaining space that isn't used by the button.
Adding the comma after the right bracket tells the formatter how to format the code.
Next, you add a Send button. This is a Material app, so use the corresponding Material icon ▷ :
행을 사용하면 입력 필드 옆에 Send button를 배치할 수 있습니다.
Flexible 위젯 안에 있는 TextField를 줄바꿈하면 행은 버튼에서 사용하지 않는 나머지 공간을 사용하도록 텍스트 필드의 크기를 자동으로 조정하도록 지시합니다. -
오른쪽 괄호 뒤에 쉼표를 추가하면 포맷하는 방법에 대해 포맷자에게 알려줍니다.
그런 다음 Send button를 추가합니다. 이것은 Material 앱이므로 해당 Material 아이콘을 사용하십시오.
|
Tip: For a list of the standard Material Design icons, see the Material Icons site and the constants in the Icons class. 표준 재료 설계 아이콘 목록은 Material Icons 사이트 및 Icons 클래스의 상수를 참조하십시오. |
▶ Add the Send button to the Row.
The Send button becomes the second item in the Row's list.
1. Position the cursor at the end of the Flexible widget's closing right bracket and comma, and press Return to start a new line.
2. Start typing Container, and select Container from the popup. The cursor is positioned inside the container's parentheses. Press Return to start a new line.
3. Add the following lines of code to the container:
▶행에 Send button를 추가합니다.
Send button는 행 목록의 두 번째 항목이 됩니다.
1. Flexible 위젯의 닫기 오른쪽 괄호 및 쉼표 끝에 커서를 놓고 Return을 눌러 새 줄을 시작합니다.
2. Container 입력을 시작하고 팝업에서 Container를 선택합니다. cursor는 Container의 괄호 안에 위치합니다. 새 줄을 시작하려면 Return를 누릅니다.
3. Container에 다음 코드 줄을 추가합니다.
margin: EdgeInsets.symmetric(horizontal: 4.0),
child: IconButton(
    icon: const Icon(Icons.send),
onPressed: () => _handleSubmitted(_textController.text)), 
The IconButton displays the Send button.
The icon property specifies the Icons.send constant from the Material library to create a new Icon instance.
Placing the IconButton inside a Container widget lets you customize the margin spacing of the button so that it visually fits better next to your input field.
The onPressed property uses an anonymous function to invoke the _handleSubmitted() method and passes the contents of the message using the _textController.
In Dart, the arrow syntax ( => expression) is sometimes used in declaring functions. This is shorthand for { return expression; } and is only used for one-line functions. For an overview of Dart function support, including anonymous and nested functions, see the Dart Language Tour.
▶ Hot reload the app to see the Send button:
IconButton에 Send button가 표시됩니다.
아이콘 속성은 새 Icon instance를 만들기 위해 Material 라이브러리의 Icons.send 상수를 지정합니다.
IconButton을 Container 위젯에 배치하면 입력 필드 옆에 더 잘 보이도록 단추의 여백 간격을 사용자 정의할 수 있습니다.
onPressed 속성은 익명 함수를 사용하여 _handleSubmited() method를 호출하고 _textController를 사용하여 메시지 내용을 전달합니다.
Dart에서 화살표 구문(=> 식)은 때때로 함수를 선언하는 데 사용됩니다. 이것은 {return expression; }의 줄임말로, 한 줄 함수에만 사용됩니다. 익명 및 중첩 기능을 포함한 Dart 기능 지원에 대한 개요는 Dart Language Tour를 참조하십시오.
▶ Send button을 보려면 앱을 Hot reload하십시오.

The color of the button is black, which comes from the default Material Design theme. To give the icons in your app an accent color, pass the color argument to IconButton, or apply a different theme.
버튼의 색상은 기본 Material Design 테마에서 가져온 검정색입니다. 앱의 아이콘을 액센트 색으로 지정하려면 색 인수를 IconButton에 전달하거나 다른 테마를 적용합니다.
▶ In _buildTextComposer(), wrap the Container in an IconThem:.
Select Container at the top of the _buildTextComposer() function.
Press Option+Return (macOS) or Alt+Enter (Linux and Windows) to bring up a menu, and select Wrap with widget. A new widget is added that wraps the Container. The placeholder name is selected, and the IDE waits for you to enter a new placeholder name.
Start typing Row, and select IconTheme from the list. The child property is surrounded by a red box, and the analyzer tells you that the data property is required.
Add the data property:
▶ _buildText Composer()에서 Container를 IconThem으로 쌉니다.:
_buildText Composer() 함수의 맨 위에 있는 Container를 선택합니다.
메뉴를 불러오려면 옵션+복귀(macOS) 또는 Alt+Enter(Linux 및 Windows)를 누르고 Wrap with widget을 선택합니다. 컨테이너를 감싸는 새 위젯이 추가됩니다. 자리 표시자 이름이 선택되고 IDE는 사용자가 새 자리 표시자 이름을 입력할 때까지 기다립니다.
행 입력을 시작하고 목록에서 IconTheme을 선택합니다. 하위 속성은 빨간색 상자로 둘러싸여 있으며 분석기는 데이터 속성이 필요하다는 것을 알려줍니다.
데이터 속성 추가:
return IconTheme(
  data: IconThemeData(color: Theme.of(context).accentColor), // NEW
child: Container( 
6. Debug your app
There are a couple of ways to debug your app. You can either use your IDE directly to set breakpoints, or you can use Dart DevTools (not to be confused with Chrome DevTools). This codelab demonstrates how to set breakpoints using Android Studio and IntelliJ. If you are using another editor, like VS Code, use DevTools for debugging. For a gentle introduction to Dart DevTools, see Step 2.5 of Write your first Flutter app on the web.
The Android Studio and IntelliJ IDEs enable you to debug Flutter apps running on an emulator, a simulator, or a device. With these editors, you can:
앱을 디버깅하는 몇 가지 방법이 있습니다. IDE를 사용하여 중단점을 직접 설정하거나 Dart DevTools를 사용할 수 있습니다(Chrome DevTools와 혼동하지 않음). 이 코드랩은 Android Studio 및 IntelliJ를 사용하여 중단점을 설정하는 방법을 보여줍니다. VS Code와 같은 다른 편집기를 사용하는 경우 디버깅에 DevTools를 사용합니다. Dart DevTools에 대한 자세한 내용은 웹에서 첫 번째 플룻 앱 작성의 2.5단계를 참조하십시오.
Android Studio 및 IntelliJ IDE를 사용하면 에뮬레이터, 시뮬레이터 또는 장치에서 실행되는 Flutter 앱을 디버깅할 수 있습니다. 이러한 편집기를 사용하면 다음을 수행할 수 있습니다.
Select a device or simulator to debug your app on.
View the console messages.
Set breakpoints in your code.
Examine variables and evaluate expressions at runtime.앱을 디버깅할 장치 또는 시뮬레이터를 선택합니다.
콘솔 메시지를 봅니다.
코드에서 중단점을 설정합니다.
변수를 검사하고 런타임에 식을 평가합니다.
|
Tip: To learn more about debugging Flutter apps, see Debugging Flutter apps. |
The Android Studio and IntelliJ editors show the system log while your app is running, and provides a Debugger UI to work with breakpoints and control the execution flow.

Work with breakpoints
▶Debug your Flutter app using breakpoints:
Open the source file in which you want to set a breakpoint.
Locate the line where you want to set a breakpoint, click it, and then select Run > Toggle Line Breakpoint. Alternatively, you can click in the gutter (to the right of the line number) to toggle a breakpoint.
If you weren't running in debug mode, stop the app.
Restart the app using Run > Debug, or by clicking the Run debug button in the UI.
The editor launches the Debugger UI and pauses the execution of your app when it reaches the breakpoint. You can then use the controls in the Debugger UI to identify the cause of the error.
Practice using the debugger by setting breakpoints on the build() methods in your FriendlyChat app, and then run and debug the app. You can inspect the stack frames to see the history of method calls by your app.
▶ breakpoint를 사용하여 Flutter 앱을 디버깅합니다
중단점을 설정할 원본 파일을 엽니다.
중단점을 설정할 라인을 찾아 클릭한 다음 Run > Toggle Line Breakpoint을 선택합니다. 또는 거터(라인 번호 오른쪽)를 클릭하여 중단점을 전환할 수 있습니다.
디버그 모드를 실행하지 않은 경우 앱을 중지합니다.
Run > Debug를 사용하거나 UI에서 Run debug 버튼을 클릭하여 앱을 다시 시작합니다.
편집자는 디버거 UI를 시작하고 중단점에 도달하면 앱 실행을 일시 중지합니다. 그런 다음 디버거 UI의 컨트롤을 사용하여 오류의 원인을 식별할 수 있습니다.
FriendlyChat 앱의 build() 메서드에 중단점을 설정하여 디버거 사용을 연습한 다음 앱을 실행하고 디버그합니다. stack frames을 검사하여 앱의 메서드 호출 기록을 확인할 수 있습니다.
길이가 길어진 관계로 3탄으로 넘어가야겠습니다.
아래 코드는 2까지의 진행 결과입니다.
gurcks8989/Flutter
Application_Development_Project. Contribute to gurcks8989/Flutter development by creating an account on GitHub.
github.com
01/21/목 - Building beautiful UIs with Flutter - 3
해당 사이트를 기준으로 작성하였습니다. https://codelabs.developers.google.com/codelabs/flutter#0 Building beautiful UIs with Flutter | Google Codelabs Flutter is Google’s UI toolkit for build..
coding-leaf.tistory.com
