해당 사이트를 기준으로 작성하였습니다.
https://codelabs.developers.google.com/codelabs/flutter#0
Building beautiful UIs with Flutter | Google Codelabs
Flutter is Google’s UI toolkit for building beautiful, natively compiled applications for mobile, web, and desktop from a single codebase. In this codelab, you learn how to build a Flutter UI from the ground up in an IDE. You also customize your user int
codelabs.developers.google.com
또한 이전 게시글의 후속편이기 때문에 7번부터 시작합니다. 진행에 어려움이 있다면 아래 글을 먼저 보고 오시는 것을 추천드립니다.
01/21/목 - Building beautiful UIs with Flutter - 1
해당 사이트를 기준으로 작성하였습니다. https://codelabs.developers.google.com/codelabs/flutter#0 Building beautiful UIs with Flutter | Google Codelabs Flutter is Google’s UI toolkit for building..
coding-leaf.tistory.com
01/21/목 - Building beautiful UIs with Flutter - 2
해당 사이트를 기준으로 작성하였습니다. https://codelabs.developers.google.com/codelabs/flutter#0 Building beautiful UIs with Flutter | Google Codelabs Flutter is Google’s UI toolkit for building..
coding-leaf.tistory.com
7. Add a UI for displaying messages
With the basic app scaffolding and screen in place, now you're ready to define the area where chat messages are displayed.

Implement a chat message list
In this section, you create a widget that displays chat messages using composition (creating and combining multiple smaller widgets). You start with a widget that represents a single chat message. Then, you nest that widget in a parent scrollable list. Finally, you nest the scrollable list in the basic app scaffold.
이 섹션에서는 작성을 사용하여 채팅 메시지를 표시하는 위젯을 생성합니다 (여러 개의 작은 위젯 생성 및 결합). 단일 채팅 메시지를 나타내는 위젯으로 시작합니다. 그런 다음 해당 위젯을 상위 스크롤 가능 목록에 중첩합니다. 마지막으로 기본 앱 scaffold에 스크롤 가능한 목록을 중첩합니다.
▶Add the ChatMessage stateless widget:
1. Position the cursor after the FriendlyChatApp class and start to type stless. (The order of the classes doesn't matter, but this order makes it easier to compare your code to the solution.)
2. Enter ChatMessage for the class name.
▶ ChatMessage stateless 위젯을 추가합니다 .
1. FriendlyChatApp클래스 뒤에 커서를 놓고 stless 입력합니다 (클래스의 순서는 중요하지 않지만 이 순서를 사용하면 코드를 솔루션과 더 쉽게 비교할 수 있습니다.)
2. ChatMessage클래스 이름을 입력하십시오 .
▶ Add a Row to the build() method for ChatMessage:
1. Position the cursor inside the parentheses in return Container(), and press Return to start a new line.
2. Add a margin property:
▶ Row에 대한 build() method를 추가하십시오 ChatMessage.
1. return Container()의 괄호 안에 커서를 놓고 Return을 눌러 새 줄을 시작합니다.
2. margin속성 추가 :
margin: EdgeInsets.symmetric(vertical: 10.0),
3. The Container's child will be a Row. The Row's list contains two widgets: an avatar and a column of text.
3. Containe의 상속받는 것은 Row가 될 예정입니다. Row 목록에는 avatar와 텍스트 열의 두 가지 위젯이 있습니다.
return Container(
  child: Row(
    crossAxisAlignment: CrossAxisAlignment.start,
    children: [
      Container(
        margin: const EdgeInsets.only(right: 16.0),
        child: CircleAvatar(child: Text(_name[0])),
      ),
      Column(
        crossAxisAlignment: CrossAxisAlignment.start,
        children: [
          Text(_name, style: Theme.of(context).textTheme.headline4),
          Container(
            margin: EdgeInsets.only(top: 5.0),
            child: Text(text),
          ),
        ],
      ),
    ],
  ),
);4. Add a text variable and a constructor to the top of ChatMessage:
4. ChatMessage 상단에 텍스트 변수와 생성자를 추가합니다.
class ChatMessage extends StatelessWidget {
  ChatMessage({this.text});     // NEW
final String text; // NEWAt this point, the analyzer should only complain about _name being undefined. You fix that next.
▶ Define the _name variable.
Define the _name variable as shown, replacing Your Name with your own name. You use this variable to label each chat message with the sender's name. In this codelab, you hard-code the value for simplicity, but most apps retrieve the sender's name through authentication. After the main() function, add the following line:
▶_name 변수를 정의합니다.
표시된 대로 _name 변수를 정의하여 Your Name을 사용자 이름으로 바꿉니다. 이 변수를 사용하여 각 채팅 메시지에 발신인 이름으로 레이블을 지정할 수 있습니다. 이 codelab에서는 단순성을 위해 값을 하드 코드화하지만 대부분의 앱은 인증을 통해 보낸 사람의 이름을 검색합니다. main() 함수 후에 다음 줄을 추가합니다.
String _name = 'Your Name';
Implement a chat message list in the UI
The next refinement is to get the list of chat messages and show it in the UI. You want this list to be scrollable so that users can view the message history. The list should also present the messages in chronological order, with the most recent message displayed at the bottom-most row of the visible list.
다음 세분화는 채팅 메시지 목록을 가져와 UI에 표시하는 것입니다. 사용자가 메시지 기록을 볼 수 있도록 이 목록을 스크롤할 수 있도록 합니다. 목록에는 또한 메시지를 시간순으로 표시하고, 가장 최근 메시지는 표시된 목록의 맨 아래 행에 표시해야 합니다.
▶ Add a _messages list to ChatScreenState.
In the ChatScreenState definition, add a List member called _messages to represent each chat message:
▶ ChatScreenState에 _messages 목록을 추가합니다.
ChatScreen 상태 정의에서 _messages라는 List 멤버를 추가하여 각 채팅 메시지를 표시합니다.
class ChatScreenState extends State<ChatScreen> {
  final List<ChatMessage> _messages = [];      // NEW
  final _textController = TextEditingController();
▶ Modify the _handleSubmitted() method in ChatScreenState.
When the user sends a chat message from the text field, the app should add the new message to the message list. Modify the _handleSubmitted() method to implement this behavior:
ChatScreenState에서 _handleSubmited() 메서드를 수정합니다.
사용자가 텍스트 필드에서 채팅 메시지를 보낼 때 앱은 메시지 목록에 새 메시지를 추가해야 합니다. 이 동작을 구현하도록 _handleSubmited() 메서드를 수정합니다.
void _handleSubmitted(String text) {
  _textController.clear();
  ChatMessage message = ChatMessage(    //NEW
    text: text,                         //NEW
  );                                    //NEW
  setState(() {                         //NEW
    _messages.insert(0, message);       //NEW
  });                                   //NEW
 }
▶Put the focus back on the text field after content submission.
1. Add a FocusNode to ChatScreenState:
내용 제출 후 텍스트 필드에 다시 포커스를 맞춥니다.
1. ChatScreen 상태에 FocusNode 추가:
class _ChatScreenState extends State<ChatScreen> {
  final List<ChatMessage> _messages = [];
  final _textController = TextEditingController();
final FocusNode _focusNode = FocusNode(); // NEW2. Add the focusNode property to the TextField in _buildTextComposer():
2. _buildTextComposer()의 TextField에 focusNode 속성을 추가합니다.
child: TextField(
  controller: _textController,
  onSubmitted: _handleSubmitted,
  decoration: InputDecoration.collapsed(hintText: 'Send a message'),
  focusNode: _focusNode,  // NEW
),3. In _handleSubmitted(), after the call to setState(), request focus on the TextField:
3. _handleSubmited()에서 setState() 호출 후 TextField에 포커스를 요청:
   setState(() {
      _messages.insert(0, message);
    });
    _focusNode.requestFocus();  // NEW
Place the message list
You're now ready to display the list of chat messages. Get the ChatMessage widgets from the _messages list, and put them in a ListView widget, for a scrollable list.
▶ In the build() method for ChatScreenState, add a ListView inside a Column:
이제 대화 메시지 목록을 표시할 준비가 되었습니다. _messages 목록에서 ChatMessage 위젯을 가져와 목록 보기 위젯에 넣어 스크롤할 수 있는 목록을 찾습니다.
ChatScreenState의 빌드() 방법에서 열 내에 ListView를 추가합니다.
Widget build(BuildContext context) {
  return Scaffold(
    appBar: AppBar(title: Text ('FriendlyChat')),
    body: Column(                                        // MODIFIED
      children: [                                        // NEW
        Flexible(                                        // NEW
          child: ListView.builder(                       // NEW
            padding: EdgeInsets.all(8.0),                // NEW
            reverse: true,                               // NEW
            itemBuilder: (_, int index) => _messages[index], // NEW
            itemCount: _messages.length,                 // NEW
          ),                                             // NEW
        ),                                               // NEW
        Divider(height: 1.0),                            // NEW
        Container(                                       // NEW
          decoration: BoxDecoration(
            color: Theme.of(context).cardColor),         // NEW
          child: _buildTextComposer(),                   //MODIFIED
        ),                                               // NEW
      ],                                                 // NEW
    ),                                                   // NEW
  );
}
Column: Lays out its direct children vertically. The Column widget takes a list of child widgets (same as a Row) that becomes a scrolling list and a row for an input field.
Flexible, as a parent of ListView: Tells the framework to let the list of received messages expand to fill the Column height while TextField remains a fixed size.
Divider: Draws a horizontal line between the UI for displaying messages and the text input field for composing messages.
Container, as a parent of the text composer: Defines background images, padding, margins, and other common layout details.
decoration: Creates a new BoxDecoration object that defines the background color. In this case you're using the cardColor defined by the ThemeData object of the default theme. This gives the UI for composing messages a different background from the messages list.
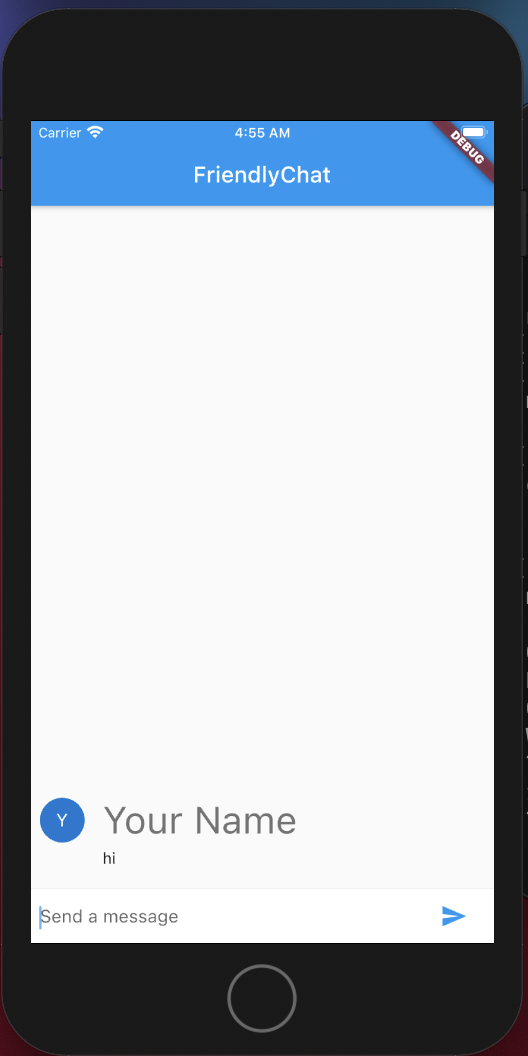
▶Hot reload the app. You should see a screen that looks as follows:


이제 얼추 메신저의 모습을 띄기 시작했다.
gurcks8989/Flutter
Application_Development_Project. Contribute to gurcks8989/Flutter development by creating an account on GitHub.
github.com
